1 介绍
1.1 Nvidia Blued Print
NVIDIA Blueprint是 NVIDIA 提供的一套针对企业级 AI 和数据分析的 参考架构与解决方案模板,旨在帮助开发者、数据科学家和 IT 团队快速构建和部署基于 NVIDIA 技术的优化应用。将Blueprint 与NVIDIA AI 以及Omniverse 库、SDK 和微服务搭配使用,企业可以构建和实施定制AI 应用— 创建数据驱动的AI飞轮。
AI-BluePrint官方博客:
NVIDIA 与合作伙伴推出代理式 AI Blueprint,助力所有企业实现工作自动化 | NVIDIA 英伟达博客
1.2 Blued Print Architecure
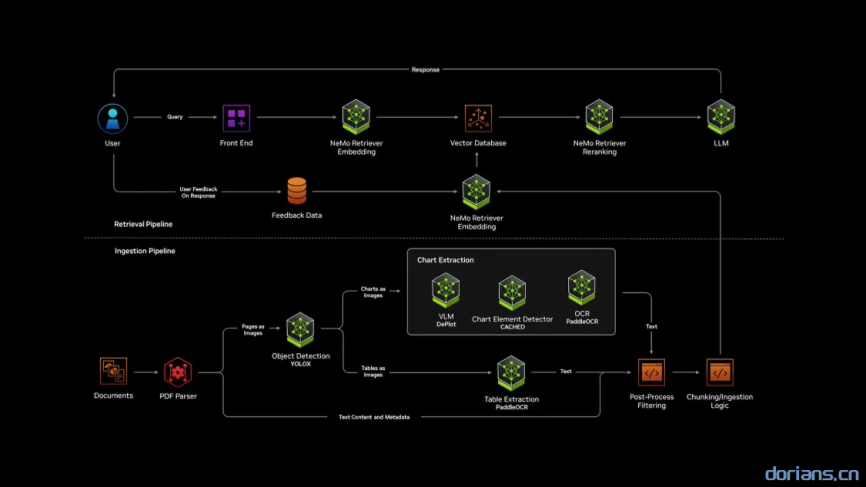
Ingestion Pipeline:将原始文档(如PDF报告)解析为结构化数据,提取多模态内容并存储至向量数据库。
- 文档解析(PDF Parser)
- 多模态内容提取
- 后置处理与(Post-Process)
- 分块与向量化(Chunking/Ingestion)
Retrieval Pipeline:快速响应用户查询,结合语义检索与大语言模型(LLM)生成精准答案。
- 用户查询(Query)
- 语义嵌入生成(Embedding)
- 向量数据库检索
- 重排序(Reranking)
- 生成最终响应(Response)
- 反馈优化(User Feedback)
1.3 相关技术
-
NVIDIA NIM:NVIDIA AI Enterprise 的一部分,为跨云、数据中心和工作站的自托管GPU 加速推理微服务提供容器,用于预训练和自定义AI 模型。 使用单个命令部署后,NIM 微服务会公开行业标准API,以便轻松集成到AI 应用程序、开发框架和工作流程中。
相关网站:面向开发者的 NVIDIA NIM
-
NVIDIA NeMo:NVIDIA NeMo™ 是一款端到端云原生框架,可以让用户不受位置限制,灵活地构建、定制和部署生成式 AI 模型。它包含训练和推理框架、护栏工具包、数据管护工具和预训练模型,为企业快速采用生成式 AI 提供了一种既简单、又经济的方法。
相关网站:NVIDIA NeMo 框架
-
NVIDIA NeMo Retriever:是一个微服务集合,用于构建和扩展多模态数据提取、嵌入和重新排序管道,具有高精度和最大的数据隐私检索服务(使用NVIDIA NIM构建)。
-
NeMo Retriever Extraction(NV-Ingest):NVIDIA发布的关于Multimodal PDF Data Extraction的一个GitHub开源示例,是一种可扩展的、面向性能的文档内容和元数据提取微服务。
相关网站:
2 NV-Ingest Architecture
支持将文档拆分为多个页面,对其中的结构(如文本、表格、图表和图像)进行分类、提取,并通过扫描识别(OCR) 进一步上下文化为定义明确的 JSON 架构。
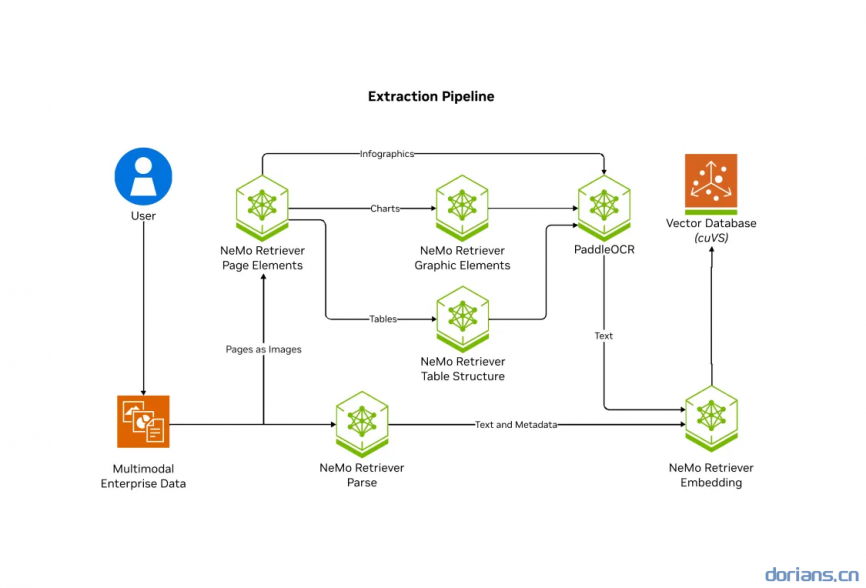
支持的文件类型:
docx、pptx、jpeg、png、svg、tiff、txt
Included NIM
- nv-embedqa-e5-v5:面向问答检索的英文文本嵌入模型。
- nv-rerankqa-mistral4b-v3:多语言文本重新排序模型。
- google-deplot:通过一次性的视觉语言理解,将绘图图像转化为表格。
- nv-yolox-structured-image-v1:用于对象检测的模型,经过微调可以检测文档中的图表、表格和标题。
- cached:上下文感知的图表提取,可以检测18类图表基本元素,不包括情节元素。
- paddleocr:OCR,识别图像及其边界框中的文本。
3 部署准备
软件
- Linux作系统(建议使用 Ubuntu 22.04 或更高版本)
- Docker
- Docker Compose
- CUDA Toolkit (驱动≥12.2、CUDA≥535)
- NVIDIA Container Toolkit
- Conda
硬件
| GPU | Family | Memory | Minimum GPUs |
|---|---|---|---|
| H100 | SXM or PCIe | 80GB | 1 |
| A100 | SXM or PCIe | 80GB | 1 |
| A10G | — | 24GB | 1 |
| L40S | — | 48GB | 1 |
4 库模式部署(服务接口)
4.1 创建conda环境(python=3.10)
conda create -y --name nvingest python=3.10 && \
conda activate nvingest && \
conda install -y -c rapidsai -c conda-forge -c nvidia nv_ingest=25.3.0 nv_ingest_client=25.3.0 nv_ingest_api=25.3.0 && \
pip install opencv-python llama-index-embeddings-nvidia pymilvus 'pymilvus[bulk_writer, model]' milvus-lite nvidia-riva-client unstructured-client
4.2 设置API KEY
购买链接:NVIDIA
#Note: these should be the same value

export NVIDIA_BUILD_API_KEY=nvapi-...
export NVIDIA_API_KEY=nvapi-...
4.3 使用Python调用服务
import logging, os, time, sys
from nv_ingest.util.pipeline.pipeline_runners import start_pipeline_subprocess
from nv_ingest_client.client import Ingestor, NvIngestClient
from nv_ingest_client.message_clients.simple.simple_client import SimpleClient
from nv_ingest.util.pipeline.pipeline_runners import PipelineCreationSchema
from nv_ingest_client.util.process_json_files import ingest_json_results_to_blob
# Start the pipeline subprocess for library mode
config = PipelineCreationSchema()
pipeline_process = start_pipeline_subprocess(config)
# you can configure the subprocesses to log stderr to stdout for debugging purposes
#pipeline_process = start_pipeline_subprocess(config, stderr=sys.stderr, stdout=sys.stdout)
client = NvIngestClient(
message_client_allocator=SimpleClient,
message_client_port=7671,
message_client_hostname="localhost"
)
# Note: gpu_cagra accelerated indexing is not yet available in milvus-lite
# Provide a filename for milvus_uri to use milvus-lite
milvus_uri = "milvus.db"
collection_name = "test"
sparse=False
# do content extraction from files
ingestor = (
Ingestor(client=client)
.files("data/multimodal_test.pdf")
.extract(
extract_text=True,
extract_tables=True,
extract_charts=True,
extract_images=True,
paddle_output_format="markdown",
extract_infographics=True,
# Slower, but maximally accurate, especially for PDFs with pages that are scanned images
#extract_method="nemoretriever_parse",
text_depth="page"
).embed()
.vdb_upload(
collection_name=collection_name,
milvus_uri=milvus_uri,
sparse=sparse,
# for llama-3.2 embedder, use 1024 for e5-v5
dense_dim=2048
)
)
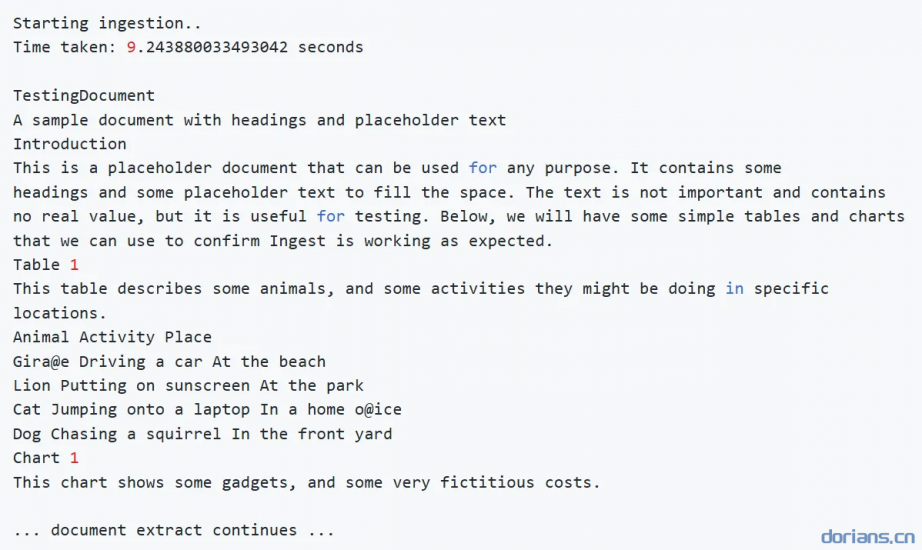
print("Starting ingestion..")
t0 = time.time()
results = ingestor.ingest(show_progress=True)
t1 = time.time()
print(f"Time taken: {t1-t0} seconds")
# results blob is directly inspectable
print(ingest_json_results_to_blob(results[0]))import logging, os, time, sys
from nv_ingest.util.pipeline.pipeline_runners import start_pipeline_subprocess
from nv_ingest_client.client import Ingestor, NvIngestClient
from nv_ingest_client.message_clients.simple.simple_client import SimpleClient
from nv_ingest.util.pipeline.pipeline_runners import PipelineCreationSchema
from nv_ingest_client.util.process_json_files import ingest_json_results_to_blob
# Start the pipeline subprocess for library mode
config = PipelineCreationSchema()
pipeline_process = start_pipeline_subprocess(config)
# you can configure the subprocesses to log stderr to stdout for debugging purposes
#pipeline_process = start_pipeline_subprocess(config, stderr=sys.stderr, stdout=sys.stdout)
client = NvIngestClient(
message_client_allocator=SimpleClient,
message_client_port=7671,
message_client_hostname="localhost"
)
# Note: gpu_cagra accelerated indexing is not yet available in milvus-lite
# Provide a filename for milvus_uri to use milvus-lite
milvus_uri = "milvus.db"
collection_name = "test"
sparse=False
# do content extraction from files
ingestor = (
Ingestor(client=client)
.files("data/multimodal_test.pdf")
.extract(
extract_text=True,
extract_tables=True,
extract_charts=True,
extract_images=True,
paddle_output_format="markdown",
extract_infographics=True,
# Slower, but maximally accurate, especially for PDFs with pages that are scanned images
#extract_method="nemoretriever_parse",
text_depth="page"
).embed()
.vdb_upload(
collection_name=collection_name,
milvus_uri=milvus_uri,
sparse=sparse,
# for llama-3.2 embedder, use 1024 for e5-v5
dense_dim=2048
)
)
print("Starting ingestion..")
t0 = time.time()
results = ingestor.ingest(show_progress=True)
t1 = time.time()
print(f"Time taken: {t1-t0} seconds")
# results blob is directly inspectable
print(ingest_json_results_to_blob(results[0]))提取结果:
4.4 查询提取内容
from openai import OpenAI
from nv_ingest_client.util.milvus import nvingest_retrieval
import os

milvus_uri = "milvus.db"
collection_name = "test"
sparse=False

queries = ["Which animal is responsible for the typos?"]

retrieved_docs = nvingest_retrieval(
    queries,
    collection_name,
    milvus_uri=milvus_uri,
    hybrid=sparse,
    top_k=1,
)

# simple generation example
extract = retrieved_docs[0][0]["entity"]["text"]
client = OpenAI(
  base_url = "https://integrate.api.nvidia.com/v1",
  api_key = os.environ["NVIDIA_BUILD_API_KEY"]
)

prompt = f"Using the following content: {extract}\n\n Answer the user query: {queries[0]}"
print(f"Prompt: {prompt}")
completion = client.chat.completions.create(
  model="nvidia/llama-3.1-nemotron-70b-instruct",
  messages=[{"role":"user","content": prompt}],
)
response = completion.choices[0].message.content

print(f"Answer: {response}")
5 自托管部署
5.1 clone仓库
git clone https://github.com/nvidia/nv-ingest && \
cd nv-ingest

# 如果有版本需求可以通过以下方式更改版本
# 1 切换指定版本分支
git checkout [branch_name]

# 2 拉取的时候拉取指定版本分支
git clone https://github.com/nvidia/nv-ingest --branch [branch_name]
5.2 NGC身份验证
$ docker login nvcr.io
Username: $oauthtoken
Password: <Your Key>

# username 固定为  $oauthtoken
# Key : nvapi-·····
5.3 配置.env环境变量
export NGC_API_KEY=<enter-key-here>

cat << EOF > .env
NGC_API_KEY=$NGC_API_KEY
DATASET_ROOT=/home/ubuntu/verb-workspace/data
NV_INGEST_ROOT=/home/ubuntu/verb-workspace/nv-ingest
EOF
.env`配置文件中必须包含以下两个api key
# Container images must access resources from NGC.

NGC_API_KEY=<key to download containers from NGC>
NIM_NGC_API_KEY=<key to download model files after containers start>其他环境变量设置可以参考:Environment Variables
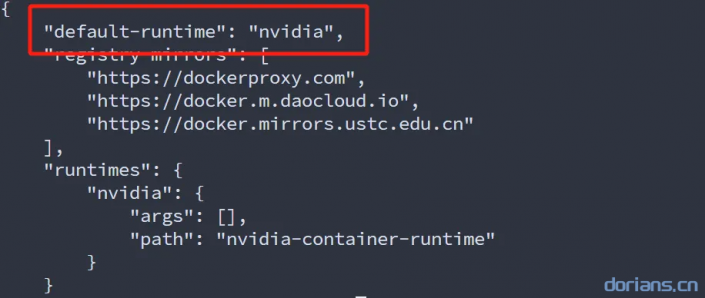
5.3 设置默认容器runtime
docker-compose.yaml默认是使用单卡运行程序,如果是多卡运行需要修改参数。
sudo nvidia-ctk runtime configure --runtime=docker --set-as-default
执行后可以打开文件/etc/docker/daemon.json进行确认:
5.4 启动服务
docker compose --profile retrieval --profile table-structure up
profile可选参数
| Name | 类型 | 描述 | GPU 要求 | 磁盘空间要求 |
|---|---|---|---|---|
retrieval |
Core | 启用嵌入 NIM 和(GPU 加速的)Milvus。 | 所有核心配置文件总共 1 个 GPU 。 |
所有核心配置文件总共 ~150GB。 |
table-structure |
Core | 启用 yolox 表结构 NIM,以增强提取的表内容的 Markdown 格式。这有利于下游 LLM 生成答案。 | 所有核心配置文件总共 1 个 GPU 。 |
所有核心配置文件总共 ~150GB。 |
audio |
Advanced | 使用 Riva 处理音频文件。有关更多信息,请参阅音频处理 。 |
1 个额外的专用 GPU | ~37GB 额外空间 |
nemoretriever-parse |
Advanced | 使用 nemoretriever-parse | 1 个额外的专用 GPU | ~16 GB 额外空间 |
vlm |
Advanced | 使用 llama 3.2 11B VLM 对非结构化图像进行实验性图像描述。 | 1 个额外的专用 GPU | ~16GB 额外空间 |
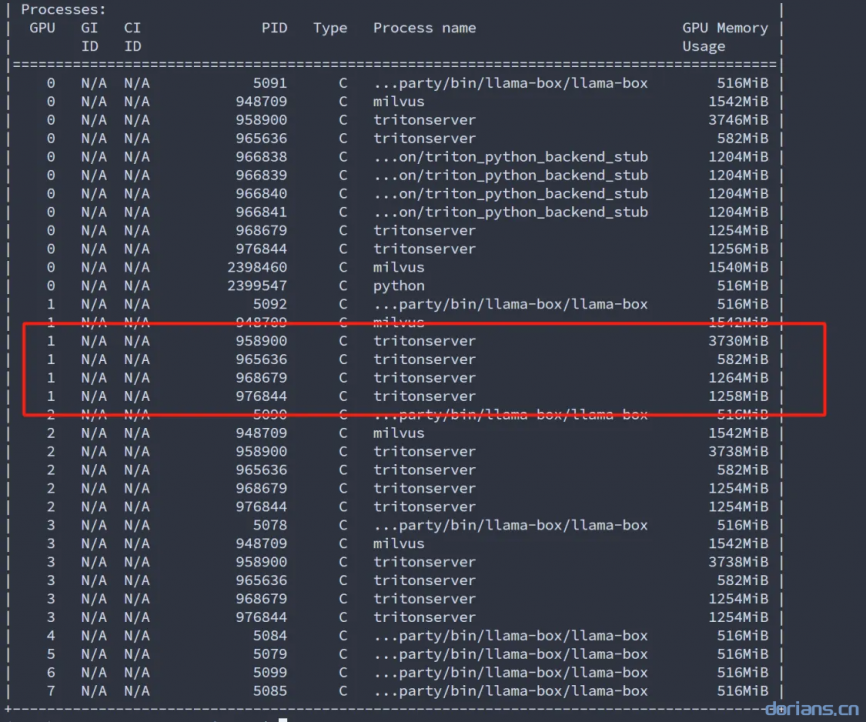
服务完全启动时,应显示如下进程:
nvidia-smi也可以使用
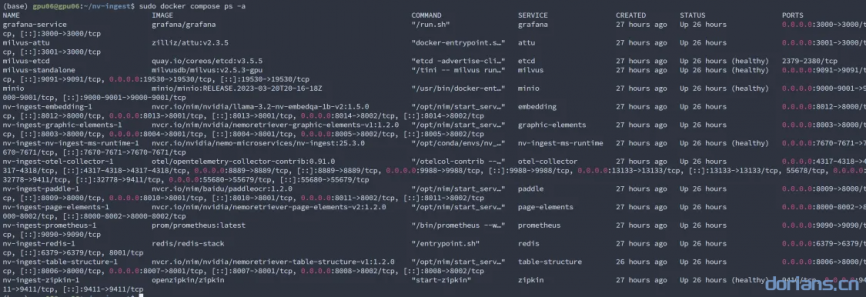
docker ps查看容器运行情况
5.6 提取文档
安装python依赖
conda create --name nv-ingest-dev python=3.10

conda activate nv-ingest-dev

pip install nv-ingest-client==2025.3.10.dev20250310
在nv-ingest-nv-ingest-ms-runtime-1镜像中已经预装了以上python包,可以进入容器内运行。
使用python脚本提取文档
import logging, os, time
from nv_ingest_client.client import Ingestor, NvIngestClient
from nv_ingest_client.util.process_json_files import ingest_json_results_to_blob
client = NvIngestClient(
    message_client_port=7670,
    message_client_hostname="localhost"
)
# do content extraction from files
ingestor = (
    Ingestor(client=client)
    .files("data/multimodal_test.pdf")
    .extract(
        extract_text=True,
        extract_tables=True,
        extract_charts=True,
        extract_images=True,
        paddle_output_format="markdown",
        extract_infographics=True,
        # extract_method="nemoretriever_parse", # Slower, but maximally accurate, especially for PDFs with pages that are scanned images
        text_depth="page"
    ).embed()
    .vdb_upload(
        collection_name="test",
        sparse=False,
        # for llama-3.2 embedder, use 1024 for e5-v5
        dense_dim=2048
    )
)
print("Starting ingestion..")
t0 = time.time()
results = ingestor.ingest()
t1 = time.time()
print(f"Time taken: {t1-t0} seconds")
# results blob is directly inspectable
print(ingest_json_results_to_blob(results[0]))使用cli提取文档
nv-ingest-cli \
  --doc ./data/multimodal_test.pdf \
  --output_directory ./processed_docs \
  --task='extract:{"document_type": "pdf", "extract_method": "pdfium", "extract_tables": "true", "extract_images": "true", "extract_charts": "true"}' \
  --client_host=localhost \
  --client_port=7670
查看抽取内容
ls -R processed_docs/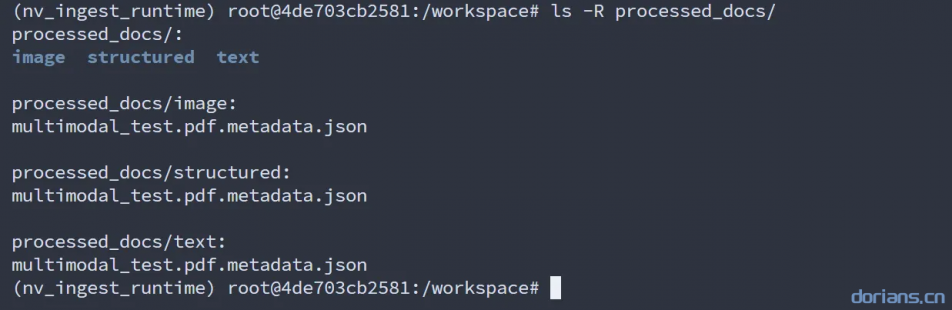
6 详细使用
6.1 使用cli处理文档
安装 Python 依赖项后,您可以使用 NV-Ingest 命令行界面 (CLI)。
检查已安装的 CLI 版本。
nv-ingest-cli --version要获取当前 CLI 命令及其选项的列表,请运行以下命令。
nv-ingest-cli --help
可以使用实例镜像nv-ingest-ms-runtime运行cli
不拆分文本(返回一个文档)
nv-ingest-cli \
  --doc ./data/test.pdf \
  --client_host=localhost \
  --client_port=7670
拆分文本
nv-ingest-cli \
  --doc ./data/test.pdf \
  --output_directory ./processed_docs \
  --task='split' \
  --client_host=localhost \
  --client_port=7670
拆分提取PDF文件
nv-ingest-cli \
  --doc ./data/test.pdf \
  --output_directory ./processed_docs \
  --task='extract:{"document_type": "pdf", "extract_method": "pdfium"}' \
  --task='extract:{"document_type": "docx", "extract_method": "python_docx"}' \
  --task='split' \
  --client_host=localhost \
  --client_port=7670
处理数据集(json)
nv-ingest-cli \
  --dataset dataset.json \
  --output_directory ./processed_docs \
  --task='extract:{"document_type": "pdf", "extract_method": "pdfium"}' \
  --client_host=localhost \
  --client_port=7670
官方预置的Python脚本
提供了用于缓存文件列表、输出采样文件列表和验证输出的选项(
__PATH__/src/util/gen_dataset.py)
python ./src/util/gen_dataset.py --source_directory=./data --size=1GB --sample pdf=60 --sample txt=40 --output_file \
  dataset.json --validate-output
6.2 使用Python API
nv-ingest API 中的主类是
Ingestor,该类提供了一个接口,用于构建、管理和运行数据摄取作业,从而支持可链接的任务添加和作业状态跟踪。
| 方法 | 描述 |
|---|---|
files |
添加文档路径以进行处理。 |
load |
确保文件可在本地访问(如果需要,可下载)。 |
extract |
添加提取任务(文本、表格、图表)。 |
split |
将文档拆分为较小的部分进行处理。 |
embed |
从提取的内容生成嵌入。 |
caption |
从文档中的图像中提取标题。 |
ingest |
同步提交作业和检索结果。 |
指定提取的PDF文件(file)
from nv_ingest_client.client.interface import Ingestor

#  单个文件
ingestor = Ingestor().files("path/to/document.pdf")
result = ingestor.extract().ingest()
print(result)

# 多个文件
ingestor = Ingestor().files(["path/to/doc1.pdf", "path/to/doc2.pdf"])
result = ingestor.extract().ingest()
for doc in result:
    print(doc)
提取指定元素(extract)
ingestor = ingestor.extract(
    extract_text=True,  # Extract text
    extract_tables=False,  # Skip table extraction
    extract_charts=True,  # Extract charts
    extract_infographics=True,  # Extract infographic images
    extract_images=False  # Skip image extraction
)
其他参数
# 显示抽取进度
result = ingestor.extract().ingest(show_progress=True)

# 支持多种类型的文档 markdown html
ingestor = Ingestor().files(["path/to/doc1.md", "path/to/doc2.html"])

# 自定义文档类型
ingestor = ingestor.extract(document_type="pdf")
拆分文档(分词器)
默认分词器meta-llama/Llama-3.2-1B,需要设置.env环境变量hf_access_token": "hf_***"
ingestor = ingestor.split(
    tokenizer="meta-llama/Llama-3.2-1B",
    chunk_size=16,
    chunk_overlap=1,
    params={"split_source_types": ["text", "PDF"], "hf_access_token": "hf_***"}
)
图像标题
使用视觉语言模型生成图像字幕, 用于描述从文档中提取的图像。默认模型
meta/llama-3.2-11b-vision-instruct
ingestor = ingestor.caption()

# 修改模型
ingestor = ingestor.caption(
    endpoint_url="https://ai.api.nvidia.com/v1/gr/meta/llama-3.2-11b-vision-instruct/chat/completions",
    model_name="meta/llama-3.2-11b-vision-instruct",
    api_key="nvapi-"
)
嵌入模型
默认嵌入模型
llama-3.2-nv-embedqa-1b-v2
# 更改模型
ingestor = ingestor.embed(
    endpoint_url="https://integrate.api.nvidia.com/v1",
    model_name="nvidia/nv-embedqa-e5-v5",
    api_key="nvapi-"
)上传到milvus
使用
vdb_upload方法进行上传
Ingestor(client=client)
    .files("data/multimodal_test.pdf")
    .extract()
    .embed()
    .caption()
    .vdb_upload(
        collection_name=collection_name,
        milvus_uri=milvus_uri,
        sparse=sparse,
        # for llama-3.2 embedder, use 1024 for e5-v5
        dense_dim=2048,
        stream=False, # True 表示采用流式插入
        recreate=False # 是否重建collection_name
    )
6.3 运行过程监控
Zipkin
系统运行的进度
- Docker部署 — 使用 http://$YOUR_DOCKER_HOST:9411/zipkin/
- Kubernetes部署 — 使用 http://$YOUR_K8S_OTEL_POD:9411/zipkin/
Prometheus
系统资源监控
- Docker — 使用 http://$YOUR_DOCKER_HOST:9090/ziplin/
- Kubernetes — 使用 http://$YOUR_K8S_OTEL_POD:9090/zipkin/
7 错误解决
7.1 nltk_data错误
运行提取任务的时候可能会遇到尝试下载punkt和punkt_tab模型时出现连接被拒绝的错误。错误信息如下
# tokenizers 缺失 -> 下载 punkt & punkt_tab
[nltk_data] Error loading punkt_tab: <urlopen error [Errno 111]
[nltk_data]     Connection refused>

# corpora 缺失 -> 下载stopwords
[nltk_data] Error loading stopwords: <urlopen error [Errno 111]
[nltk_data]     Connection refused>

# 无法加载 -> 未解压文件
[nltk_data] Error loading punkt_tab: <urlopen error [Errno 111]
[nltk_data]     Connection refused>
解决办法
1 手动下载模型
可以选择以下两种方式下载
2 配置数据目录
# 创建数据目录
mkdir -p ~/nltk_data/tokenizers/
mkdir -p ~/nltk_data/corpors/

# 解压文件
unzip ~/Downloads/punkt.zip -d ~/nltk_data/tokenizers/
unzip ~/Downloads/punkt_tab.zip -d ~/nltk_data/tokenizers/

# 解压后看一下目录结构是不是如下(tokenizers和corpors 下面不要是压缩包)
# ~/nltk_data/
# ├── corpora/
# │   └── stopwords/
# │       └── english
# └── tokenizers/
#     ├── punkt/
#     │   └── english.pickle
#     └── punkt_tab/
#         └── english.pickle

tree ~/nltk_data/

# 配置环境变量
vim ~/.bashrc
# 添加环境变量
export NLTK_DATA="/home/your_username/nltk_data"
# 更新环境变量
source ~/.bashrc
# 验证环境变量
echo $NLTK_DATA
3 验证(optional)
from nltk.tokenize import word_tokenize

# 测试英文分句
text = "Hello, how are you? This is a test."
tokens = word_tokenize(text)
print(tokens)  # 预期输出: ['Hello', ',', 'how', 'are', 'you', '?', ...]